
 Unaka Gear Co.
Ford Transit Roof Rack – Premium Explorist.life - 148" High Roof
Indexed listing. WNDR Built doesn't sell this product; the button opens unakagearco.com.
Solar crossbars shaped around a fan and AC unit
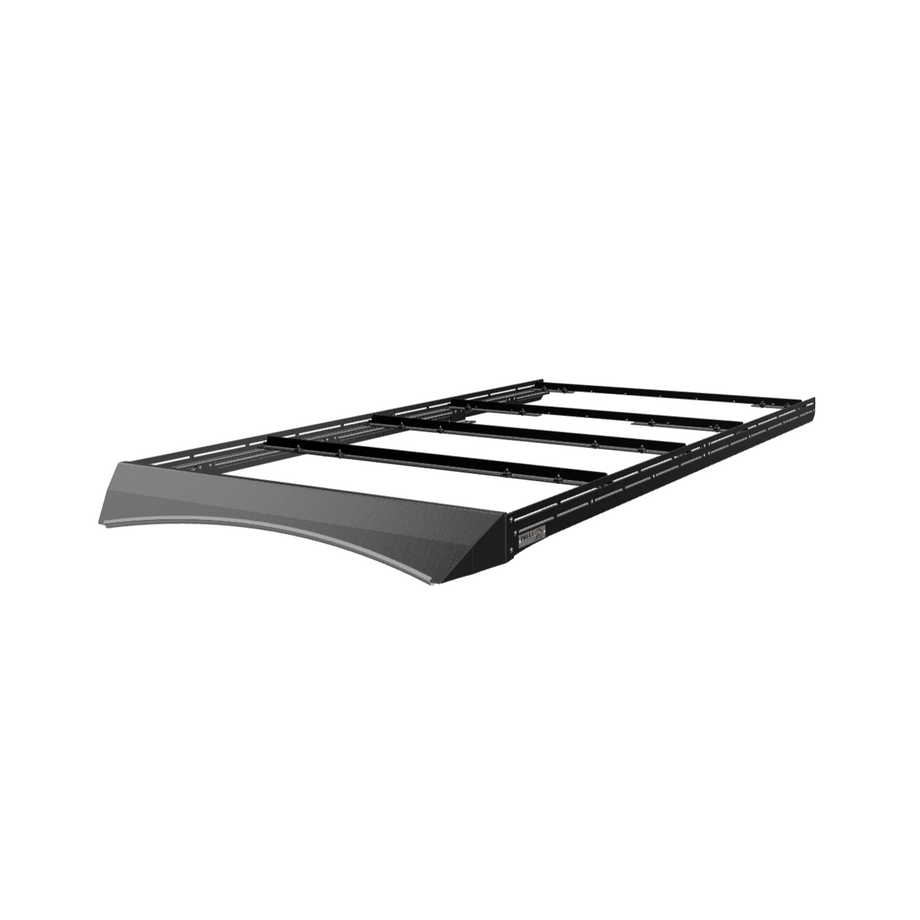
The Explorist.life version of Unaka’s Premium Transit rack combines adjustable solar crossbars with dedicated crossbars shaped around a Maxxfan and an AC unit. It is intended for a roof layout that places solar panels around those appliances, rather than using only straight crossbars across the rack.
A 15 series 8020 aluminum foundation supports laser-cut aluminum side plates that cover the side rails, with a one-piece welded aluminum wind fairing at the front. Internal channel splice plates join the rails, while drop slots allow T-nuts to be added later. Unaka supplies the solar crossbars and mounting hardware as part of this rack configuration.
Pre-measured hardware
The Premium design includes pre-measured double T-nuts and bolts with Loctite pre-applied where needed.
Black powder-coated extrusions
Unaka describes the Premium rack’s 8020 bars as black powder-coated.
Adjustable fairing
Slots in the side plates allow the fairing’s angle and forward/back position to be set during installation.
Manufacturer-listed fitment & checks
Vehicle fitment
As listed by Unaka Gear Co.
2015+ Ford Transit; this listing is the 148" High Roof Premium Explorist.life configuration.
Fan and AC placement must match the layout
The Explorist Life manual says this setup traditionally requires precise fan and AC installation before the rack, or at least before the solar panels.
Roof preparation and sealing
OEM pre-threaded roof holes must be available. Misaligned roof openings require trimming with tin snips, filing or sanding; excess paint inside an insert may require an M8x1.25 hand tap. The rear mounting positions lack threaded inserts and must be secured from inside the van. Seal the brackets, bolts and sealing washers with Dicor, which is not included.
Solar installation order
Rich Solar 250W panels (60.6" long) cannot be installed with the side plates already in place. Between immovable roof accessories, the manual says that fitting these panels is more difficult without purchased roll-in T-nuts.
Panel holes may need drilling
If mounting holes do not align, drill new holes in the solar-panel flange with a protective board behind it. Around the fan and AC, panels other than the manual’s 55W Rich Solar example may require drilling the panel or crossbar.
No light-bar capability
Unaka lists the Premium Explorist.life version as not light-bar capable.
Two-person handling and roof installation
The manual specifies two people to handle the unopened rack box and two people with two suitably tall ladders for roof installation.
Off-highway use & vehicle warranty
Unaka’s Refund policy, Terms & Conditions of Sale, states that its parts are intended for off-highway application only and that installation may void warranty coverage on your vehicle.
Anti-seize not included
The manual specifies anti-seize on the ¼-20 bolts mounting the solar panels around the fan and AC, and on the wind-fairing bolts. Anti-seize is not included; general application to bolts paired with nylock nuts is optional.
Antenna compatibility
Unaka states that the rack is compatible with the new 2026 Transit antenna location.
Solar panel width
The product page lists a maximum panel width of 60.6".
Before use & maintenance
Unaka requires an initial torque check after 4 to 7 days, a follow-up after 1 month, checks every 3 to 4 months, and checks after moderate driving on bumpy or gravel roads.
Specs, parts & installation
Rack construction
| Foundation | 15 series 8020 aluminum |
|---|---|
| Shell | Laser-cut aluminum |
| Wind fairing | One-piece welded aluminum |
| 8020 finish | Black powder-coated |
| Light-bar capability | No |
Solar layout
| Maximum panel width — product page | 60.6" |
|---|---|
| Main solar crossbars | 4 L-shaped aluminum crossbars for mounting two 200W solar panels |
| Fan-area crossbars | 2 L-shaped aluminum crossbars for mounting solar panels around a Maxxfan |
| AC-area crossbars | 2 L-shaped aluminum crossbars for mounting around an AC unit |
What’s in the box
Frame & wind fairing
Roof rack with aluminum wind fairing, laser-cut side plates, four 8020 side-rail sections, roof brackets, splice plates and end caps.
Solar crossbars & hardware
Four main L-shaped solar crossbars, two fan-area crossbars, two AC-area crossbars, solar-panel spacers, and installation brackets and stainless steel hardware.
Included Allen tools
3/16 T-handle Allen wrench, 1/8 Allen wrench and 5/32 Allen wrench.
Installation at a glance
Two people and two ladders are required by Unaka’s manual.
Plan the fan and AC positions before the rack/solar installation. Prepare the factory roof mounting holes, loosely assemble the rail brackets and side rails, set the rack square, then tighten and seal the roof mounts. Install solar assemblies in the sequence required by their size before completing the side plates and fairing.
Unaka recommends professional installation or following its detailed manual.
Mounting and solar sequence
- Remove only the roof-hole covers at rack mounting pads with light heat and a plastic scraper; clean away adhesive. Hand-check M8 insert alignment without forcing the bolts.
- Leave roof brackets loose while joining side rails. Torque the internal splice hardware to 15 in-lbs, then set crossbar spacing and center the rack.
- With the rack parallel and square, torque the roof-mount hardware to 132 in-lbs, leaving crossbar hardware untorqued at that stage; seal all four bracket sides, the hex bolts and sealing washers with Dicor.
- Fit solar panels before exterior side plates where required; install the fan/AC panel assemblies first, and keep connectors accessible. Do not bolt down the assemblies until all panels are on the roof.
- For a front 250W panel, keep the front side plates loose and slide them forward to reach the lower fairing bolt; set the fairing angle, tighten those bolts, then return and tighten the side plates.
Solar spacers and drilling
- For 1.2"-thick panels, the manual uses one ¼" and one 1/8" spacer at each mounting point; for 1.4"-thick panels, one ¼" spacer at each point.
- Where panel holes do not align, mark and center-punch the locations, place a protective board behind the flange, and drill an 1/8" pilot followed by a 5/16" hole.
Additional tools & supplies listed
- ½", 7/16" and 13mm sockets and box wrenches; torque wrench (75 to 132 in-lbs), tape measure, two ladders, tin snips, sandpaper, file, caulk gun and paint-cleaning/prep materials.
- Roof-cap preparation uses a heat gun, plastic scraper and denatured alcohol. Dicor is not supplied.
Lead Time
Unaka’s Shipping Information page excludes oversized items from free shipping; its Shipping policy also excludes items shipped by LTL freight. For international orders, Shipping Information invites contact if checkout shows no shipping method, while Shipping policy says no displayed option means the country is not served.
This product
The product-page banner advertises free shipping on large Unaka products to the Lower 48; the brand’s oversized-item and LTL exclusions still appear in its policy pages.
Warranty
Unaka’s Refund policy covers workmanship and material defects for the original purchaser for the product’s production lifetime on Unaka-designed and fabricated parts, excluding third-party components, wear parts and modification or misuse; coatings are covered for up to 180 days after purchase.
Read Unaka Gear Co. warranty policy on WNDR BuiltReturns
The Refund policy’s Returns section allows refunds within 30 days of invoice, with a minimum 10% restocking fee if the customer covers shipping or 20% if forgoing shipping costs; its Terms & Conditions of Sale instead states 15 days after receipt and a 15% fee. Returns require an RMA, new condition, original packaging and prepaid freight; custom, electronic, discontinued and specially priced items are excluded, and the Terms & Conditions also excludes opened or installed parts.
Read Unaka Gear Co. returns policy on WNDR BuiltWhat are people saying?
Find owner feedback, discussions, and installation videos for this product.
Searches use the manufacturer and product name and open in a new tab. Results may include similar products.
WNDR Built Community
Our community blog is coming in the future.
Community · Coming soon