
 Shuksan Vans
Basecamp Series Roof Rack - Sprinter
Indexed listing. WNDR Built doesn't sell this product; the button opens shuksanvans.com.
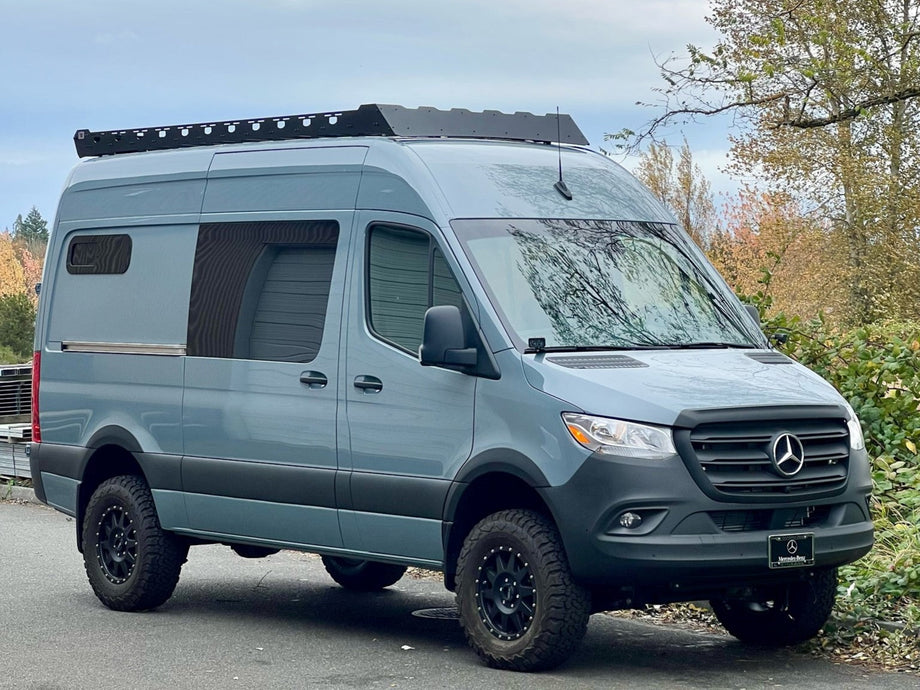
Crossbars around the roof vent
The Basecamp Series Roof Rack uses full-width crossbars and a separate crossbar assembly around the roof vent to make that part of the roof usable too. The crossbars can sit in upper or lower positions, rather than being limited to one mounting height. Optional laser-cut decking covers the crossbar sections and vent area.
The rack combines aluminum side rails, front and rear fairings, crossbars and a rear roller bar. A crossbar mounted above the rear fairing provides a position for elevated gear. The roller bar sits on bearings at the rear of the rack, while the vent-area assembly changes with the selected front- or rear-vent layout.
Two crossbar positions
Crossbars can be installed in the upper or lower positions.
Rear fairing crossbar
An extra crossbar sits above the rear fairing for elevated gear.
Rear roller bar
The Sprinter 144 guide shows the roller bar press-fitting onto flanged bearings at both ends.
Manufacturer-listed fitment & checks
Vehicle fitment
As listed by Shuksan Vans
- Sprinter High Roof 144: 2019+ Mercedes Sprinter, following the Basecamp Sprinter 144 installation guide.
- Sprinter High Roof 170: 2007+ Mercedes Sprinter High Roof, as listed on the product page.
Choose your rack layout
Match the model and vent location to your van. Both vent layouts are listed for each model, with either decking option.
Model
- Sprinter High Roof 144
- Sprinter High Roof 170
Vent Location
- Vent in Front
- Vent in Rear
Decking
- No Decking
- Fully Decked — optional laser-cut decking
Hand tools only
The Sprinter 144 guide requires hand-tightening with a wrench only; do not use an impact driver.
Fairing handling
The Sprinter 144 guide warns that the front fairing assembly may be heavy and calls for precautions when installing it.
Roof rails
Shuksan Vans lists compatibility with factory and after-market roof rails.
Awning and ladder
Compatible with the Fiamma F45S awning and Shuksan Side Ladder. The side ladder is sold separately.
Specs, parts & installation
Rack construction
| Material | Aluminum side rails, front fairing, rear fairing, roller bar, crossbars and decking |
|---|---|
| Finish | Mini-texture black powder coating |
| Crossbar positions | Upper and lower |
Sprinter 144 guide hardware
| Rail pucks | Aluminum with stainless inserts |
|---|---|
| Hardware finishes | The guide lists black oxide hardware and bright stainless side-rail hardware, roller-bar bearings and serrated nuts. |
What’s in the box
Sprinter 144 rack components
The Sprinter 144 guide lists two front side rails, two rear side rails, one front fairing, one rear fairing, two 54” front fairing bars (1x1 rounded) and one roller bar.
Sprinter 144 — Vent in Front
The guide lists full-width 54” crossbars (1x2), four 16” vent crossbars (1x2) and two 28” vent bars (1x1 square).
Sprinter 144 — Vent in Rear
The guide lists full-width 54” crossbars (1x2), six 16” vent crossbars (1x2) and two 38” vent bars (1x1 square).
Sprinter 144 mounting parts and tools
The guide lists 16 roof-rail pucks; hardware kits for the front fairing, rear fairing, vent crossbars, side rails, crossbars/fairings and roller bar; and provided 5/32 and 5/16 hex wrenches.
Sprinter 144 optional decking
The decking guide lists nine 10” X 54” decking panels, two 17” X 30” panels, and 88 each of ¼” button-head bolts of 0.5” length, ¼” flat washers and drop-in T-nuts.
Installation at a glance
The Sprinter 144 guide says an extra set of hands is helpful but not required.
Assemble the fairings and vent crossbar assemblies before mounting the rack. Slide rail pucks into the roof rails, loosely fit the side rails and crossbars, then install the roller bar and rear fairing. Use Loctite as directed. Tighten the fairing and crossbar bolts first, then the side-rail foot bolts, using a wrench only.
For non-factory roof rails, the guide positions the forward edge of the forward-most puck 8.5” from the front roof seam; follow its video for that placement.
Tools listed in the Sprinter 144 guide
- 5/32 hex wrench and 5/16 hex wrench, provided in the kit.
- 3/4” wrench, socket or crescent.
- An extra set of hands is helpful, not required.
Sprinter 144 optional decking installation
- Lay the first 10” X 54” decking panel loosely on the rack. Fit drop-in T-nuts into the crossbars at the small decking holes, then install the bolts with Loctite and flat washers.
- Loosely attach every bolt for each panel before tightening it. Repeat for the remaining full-width sections.
- Use the 17” X 30” panels for the vent crossbar area, following the same fastening procedure.
Source notes
- Shuksan Vans’s product page lists 13 full-width crossbars for the Sprinter 144; its Sprinter 144 guide lists 13 for Vent in Front and 12 for Vent in Back.
- The Basecamp Sprinter 144 guide’s package table on page 4 lists 13 full-width 54” crossbars for Vent in Front and 12 for Vent in Back; steps 2a, 4c, 6a and 7c specify 1, 1, 3 and 7 for Vent in Front, or 1, 1, 5 and 4 for Vent in Back. The disputed full-width crossbar counts are omitted from the included-parts lists.
- Shuksan Vans’s product page lists 2007+ Sprinter High Roof fitment; the Basecamp Sprinter 144 guide is labeled 2019+. This listing follows the guide for the 144 model.
- Shuksan Vans’s product page describes all stainless steel hardware and ABS roller-bar bearings; the Sprinter 144 guide labels hardware as black oxide or bright stainless and lists the roller-bar bearings under bright stainless finish. This listing follows the guide for the 144 model.
Lead Time
Free shipping over $99 to the lower 48; import duties and fees are customer responsibility.
Read Shuksan Vans lead time policy on WNDR BuiltWarranty
Read Shuksan Vans warranty policy on WNDR BuiltReturns
30 days after receipt; 25% restocking fee; custom work, sale items, and gift cards excluded.
Read Shuksan Vans returns policy on WNDR BuiltWhat are people saying?
Find owner feedback, discussions, and installation videos for this product.
Searches use the manufacturer and product name and open in a new tab. Results may include similar products.
WNDR Built Community
Our community blog is coming in the future.
Community · Coming soon