
 RB Components
2014+ Ford Transit Rear Door Bug Net (Mid Roof)
Indexed listing. WNDR Built doesn't sell this product; the button opens rbcomponents.com.
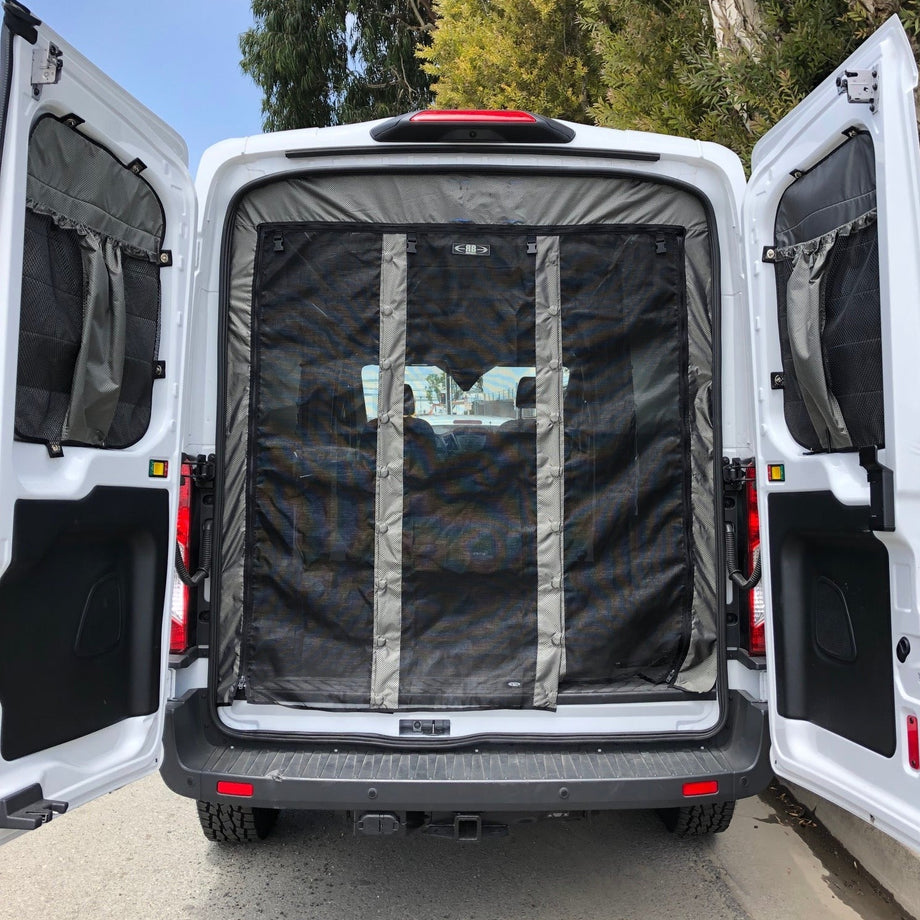
Rear-door screening with a magnetic center opening
This rear-door bug net screens the open rear doorway while allowing fresh air in. Walk through its magnetic center opening without unzipping the screen; magnetic strips keep the center closed after you pass through. Either side can also be unzipped.
The screen zips into a fabric frame that tucks behind the rear door’s rubber seal. It rolls up and clips at the top for loading or unloading, and it can stay installed when the rear doors are closed.
Transit upper flap
A magnetic flap covers the upper rear door locks and holds up with magnets when the doors are open.
Sail cloth construction
The product page specifies sail cloth and zippers.
Manufacturer-listed fitment & checks
Vehicle fitment
As listed by RB Components
2014+ Ford Transit; mid roof; rear doors.
Lower-corner trimming
Transit installation requires trimming a small amount of excess material at the lower corners so the seal and frame fit. Have scissors available.
Magnetic closure and door locks
Keep about 3/4" of material behind the seal; a tighter fit prevents the magnetic flaps from closing on their own. Lower the upper magnetic flap before closing the doors, then flip it up when the doors are opened.
Specs, parts & installation
Screen & construction
| Materials | Mesh and sail cloth |
|---|---|
| Entry | Magnetic center pass-through and zippered sides |
| Made in | U.S.A. |
What’s in the box
Screen assembly
1 rear door bug net, comprising an outer frame and zip-in screen.
Installation clips
5 fabric clips to hold the top of the frame during installation.
Installation at a glance
RB Components lists about 15–20 minutes for one person on a Transit.
Read every step before starting. The fabric frame fits behind the rear door rubber seal without drilling.
Use a rag to wipe factory grease from behind the seal before tucking in fabric. Work in sections of about 12"; do not pull the whole seal off.
Use the Ford Transit section of the linked guide, which has a different procedure from the Sprinter section.
Transit frame and screen installation sequence
- Unzip the screen from the outer frame and set it aside.
- Center the top of the frame over the upper rear door locks, with the fabric flap facing outside. Hold it with one center clip, then add clips to the left and right until all 5 are fitted.
- Press the top of the rubber seal back into place, then work down both sides, tucking the fabric evenly behind the seal.
- After fitting the lower corners as described above, orient the screen with the RB logo facing out toward the rear of the van. From inside, zip the top to the frame first, then zip both sides.
Lead Time
Read RB Components lead time policy on WNDR BuiltWarranty
Read RB Components warranty policy on WNDR BuiltReturns
Unused returns within 30 days of purchase; 10% restocking and customer-paid shipping; postmark within 30 days after approval.
Read RB Components returns policy on WNDR BuiltWhat are people saying?
Find owner feedback, discussions, and installation videos for this product.
Searches use the manufacturer and product name and open in a new tab. Results may include similar products.
WNDR Built Community
Our community blog is coming in the future.
Community · Coming soon