
 Black River
B-Van Tire Carrier for Promaster
Indexed listing. WNDR Built doesn't sell this product; the button opens blackriverbysummit.com.
Swap bike carrying for exterior spare-tire storage
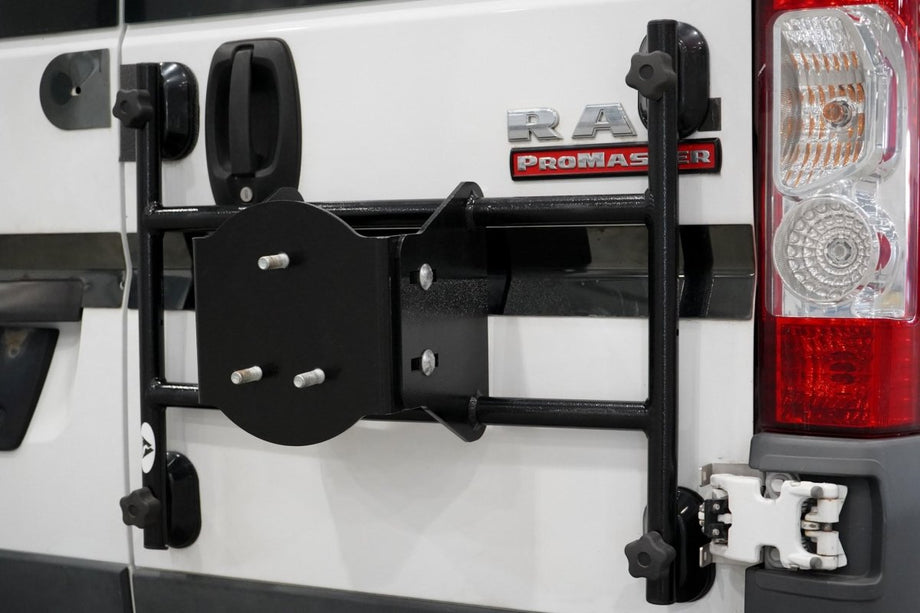
The B-Van Tire Carrier moves a spare tire outside the van, leaving interior storage for other gear. Its puck-based attachment uses the same mounting system as the Black River bike rack, so the carrier takes the bike rack’s place when you want to carry a spare instead.
An adjustable mounting plate positions the wheel against the carrier rails. The locking knobs secure the carrier at two door mounts, while the original knobs fasten the remaining two. Black River states that the carrier leaves the rear-door handle clear and functional.
Aluminum tubing
The carrier frame uses aluminum tubing.
Powder-coated finish
Black River describes the powder coating as enhancing resistance to wear, corrosion and UV damage.
Manufacturer-listed fitment & checks
Vehicle fitment
As listed by Black River
RAM Promaster vans with the existing Black River Bike Rack mounting system, including compatible Winnebago Travato setups; the guide specifies the passenger rear door.
Installation and use limits
The guide specifies manufacturer installation. Complete installation before loading; do not climb, stand or sit on the tire carrier.
Rear-door clearance
After fitting the door seam bracket, lightly close the door to check that the bracket does not interfere with the driver-side rear door. If it does, the guide instructs lightly tapping the bracket over the seam with a deadblow hammer for clearance.
Tire not included
Supply your own tire.
Existing mounting system required
Must attach to the current Black River Bike Rack puck mounting system installed by the original equipment manufacturer. The guide is for a van with the existing hardware already installed. If it is absent, the product page directs you to your local coach manufacturer or dealership to have mounting hardware installed.
Additional parts if hardware is missing
Check the van for missing components before installation. The guide lists a separate hardware kit and installation mounting plate set as additional parts sold separately; the mounting plate set requires OEM installation.
Wheel position
The guide requires the mounting plate face to sit flush against the inner face of the rim, with the tire tight against the rail at 1/8-1/4’’ interference.
Specs, parts & installation
Frame & wheel mounting
| Tubing | 1.25" aluminum tubing |
|---|---|
| Finish | Powder-coated |
| Stud size | 14mm diameter |
| Thread pitch | M14 x 1.5 |
| Maximum load | Black River states: 100 lbs. |
What’s in the box
Carrier & door bracket
One tire carrier and one door seam clamp bracket, as listed in the installation guide.
Locking knobs & hardware
Two locking knobs, the supplied key and installation hardware; existing door mounting hardware is required separately.
Installation at a glance
Conversion uses the existing bike-rack door hardware.
Remove the bike rack while leaving its hardware in place, fit the door seam bracket, adjust the tire mounting plate and attach the carrier to the pucks with its slots facing upward. The guide also covers the locking-knob retrofit; read the complete guide below.
Tools listed in the guide
- 19 MM wrench or socket
- 5/32” Allen wrench
- Deadblow hammer
Conversion and locking-knob sequence
- Fold up the bike rack, secure it with straps and detach it using the four knobs, leaving the existing hardware on the van.
- Remove the upper-left puck near the handle, align the door seam bracket with its slots and reattach the puck before continuing; check door clearance as described above.
- Set the mounting plate height for the tire and the required rim contact and tire interference, then tighten the four locknuts.
- Position the carrier with its slots facing upward; use the original knobs at the upper-right and lower-left mounts and ensure the tire tightens into the carrier rails.
- For the locking-knob retrofit, remove the upper-left and lower-right plastic mounts using the 5/32” Allen wrench, install each hex bolt against the pressed-in nut, then reinstall the mounts and rubber backers with the button head bolts.
- Align the carrier with the new bolts, screw each locking knob down until it contacts the carrier and use the supplied key to lock it; install and tighten the original knobs in the remaining two mounts.
Lead Time
Rebel Box, Rebel HB and Matrix: manufacture up to 8 weeks, plus transit; other products: receipt up to three weeks. Destination terms conflict.
This product
The product page says “Typically ships within 2-3 business days” but also displays a backorder notice stating shipment when stock returns.
Warranty
Published warranty lengths conflict with the blanket one-year FAQ; MATRIX registration is required within 30 days of delivery, before discovery of a warranty issue.
This product
The product page lists a 1-year limited warranty.
Returns
Returns within 30 days; 20% restocking fee; ordinary returns have customer-paid freight; approved error/defect/wrong-product freight returns have Black River-paid shipping; freight eligibility conflicts; custom goods excluded except Black River error.
Read Black River returns policy on WNDR BuiltWhat are people saying?
Find owner feedback, discussions, and installation videos for this product.
Searches use the manufacturer and product name and open in a new tab. Results may include similar products.
WNDR Built Community
Our community blog is coming in the future.
Community · Coming soon