
 White Top Adventures
SPRINTER 144" & 170" SIDE STEPS
Indexed listing. WNDR Built doesn't sell this product; the button opens whitetopadventures.com.
Side steps with room for a side ladder
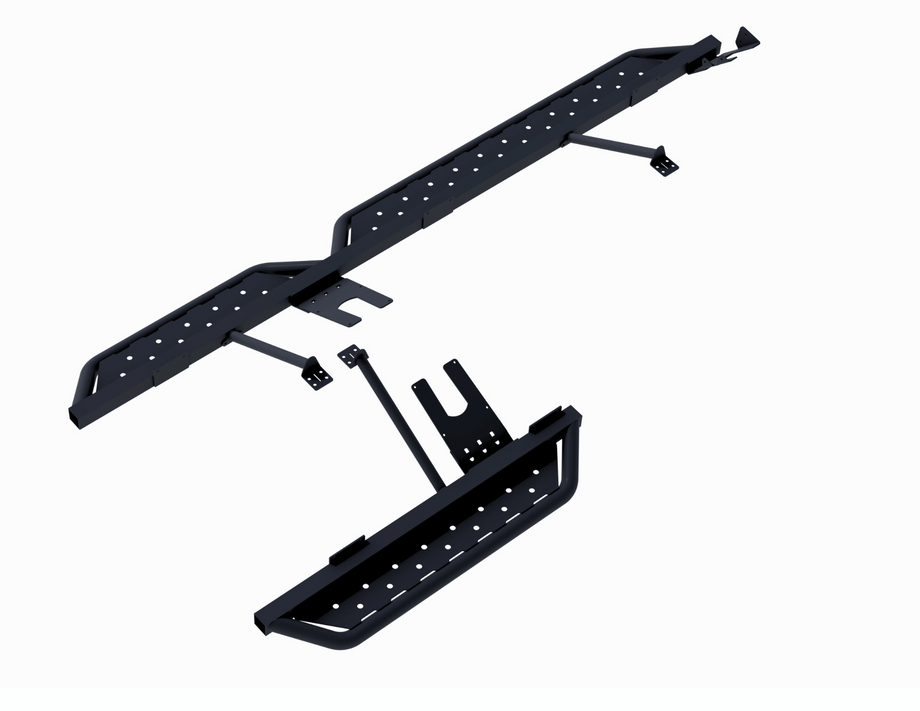
White Top Adventures’ Sprinter Side Steps add driver- and passenger-side stepping surfaces for getting in and out of the van. Dimpled plates provide a textured foothold over a tubular aluminum structure. The steps mount close to the van body.
The two sides have different layouts: the driver-side traction step stops short of the rear wheel arch to accommodate a side ladder, while the passenger side has a longer stepping surface. White Top Adventures says these steps also work with its Side Ladder and Surf Board Racks systems without modification.
Coated aluminum
The aluminum construction has a zinc-rich primer and textured black powder coat.
Joined passenger step
A connecting block joins the front and rear passenger-step sections with button-head screws and washers.
Manufacturer-listed fitment & checks
Vehicle fitment
As listed by White Top Adventures
- 2007+ Mercedes-Benz Sprinter 144" & 170" vans; high roof and standard roof.
- White Top Adventures also lists 4x4 and AWD Sprinter compatibility.
Drilling and undercoating removal
The installation guide requires drilling hanger-bracket mounting holes, pinch-weld/lower-seam holes, and brace mounting holes. It also calls for cutting away excess undercoating in two triangular areas so the P1 bracket can seat fully.
Factory rear AC/heater
Use the modified P2 bracket for factory rear AC/heater pipes. The guide calls for removing the heater-line retaining nut and lowering the lines to position the bracket and mark drilling locations, then reinstalling the bracket and securing the lines. With factory AC, there is no room to install the driver-side brace.
Mounting positions
The guide describes a standard position for front fenders with factory mudflaps and a rearward position for Mondo Mud Guards that retains the factory mudflaps. The rearward mounting position is only for accommodating modified mudguards.
Installer requirement
White Top Adventures strongly recommends professional installation. Its guide requires a qualified professional or someone with the necessary expertise if you lack mechanical experience or are unfamiliar with the installation procedures.
Before use
Securely assemble and attach the steps, inspect mounting points and attachments before use, and regularly check for wear or damage, as required by the guide.
Specs, parts & installation
Construction
| Material | Aluminum |
|---|---|
| Tubing | 2”x2” square tube and 2” round tube |
| Finish | Zinc-rich primer and textured black powder coat |
| Stepping surface | Dimpled Die plates |
| Passenger step | 54" |
Weight & load
| Product weight | 24.9 lbs |
|---|---|
| Static load | White Top Adventures states 300 lbs, unless otherwise specified by the manufacturer. |
What’s in the box
Step components
Driver step, passenger-step front and rear sections, and passenger-side connecting block.
Mounting components
P1 and P2 hanger brackets, a modified P2 bracket for factory rear AC/heater, braces, and mounting hardware.
Installation at a glance
Installation requires drilling and undercoating removal; professional installation is strongly recommended.
Assemble the passenger-step sections, fit the hanger brackets, position the step with a floor jack or helper, and mark and drill the pinch-weld holes.
Fit the braces where the guide permits, align the steps, and tighten the fasteners in the guide’s sequence. Follow the factory rear AC/heater procedure where applicable.
Guide drilling and tightening details
- The guide specifies an M6–M7 drill bit for the pinch-weld/lower-seam holes and says to place these holes as high on the pinch weld as possible.
- For brace installation, the guide specifies an M4 drill bit, four holes on the van and two on the side step, secured with ST5.5x19 self-tapping screws.
- With brace screws already tight, tighten the M6 pinch-weld bolts and nuts, then the M12 carriage bolts.
- Loctite is optional when joining the passenger-step sections.
Source notes
- White Top Adventures’ product page calls installation bolt-on and says no new holes are required for most standard installations; its linked installation guide requires drilling hanger-bracket, pinch-weld and brace holes and cutting away excess undercoating. This listing follows the guide.
- The product page says its rear heat/AC cutout plates need no van modifications; the guide requires the modified P2 bracket, moving the heater lines to mark and drill holes, and omitting the driver-side brace with factory AC. This listing follows the guide.
- The product-page weight specification is 24.9 lbs; its FAQ describes approximately 25 lbs for both pieces together.
Lead Time
Free shipping: most continental-US orders on Shipping policy, all lower-48 orders on FAQ, all orders on Homepage banner; remote-location and special-freight fees may apply.
This product
The product-page FAQ says in-stock steps ship within 1–2 business days and arrive in 3–7 business days via UPS/FedEx.
Warranty
Read White Top Adventures warranty policy on WNDR BuiltReturns
Returns within 30 days of delivery require unused, uninstalled, unassembled items in original packaging; 15% restocking and customer-paid shipping apply; large freight items have additional fees.
This product
The product-page FAQ says White Top Adventures covers return shipping for fitment issues or product defects and considers requests past 30 days case by case.
What are people saying?
Find owner feedback, discussions, and installation videos for this product.
Searches use the manufacturer and product name and open in a new tab. Results may include similar products.
WNDR Built Community
Our community blog is coming in the future.
Community · Coming soon