
 Flatline Van Co.
Sprinter Van Rear Door Platform
Indexed listing. WNDR Built doesn't sell this product; the button opens flatlinevanco.com.
A rear-door mounting surface for your gear
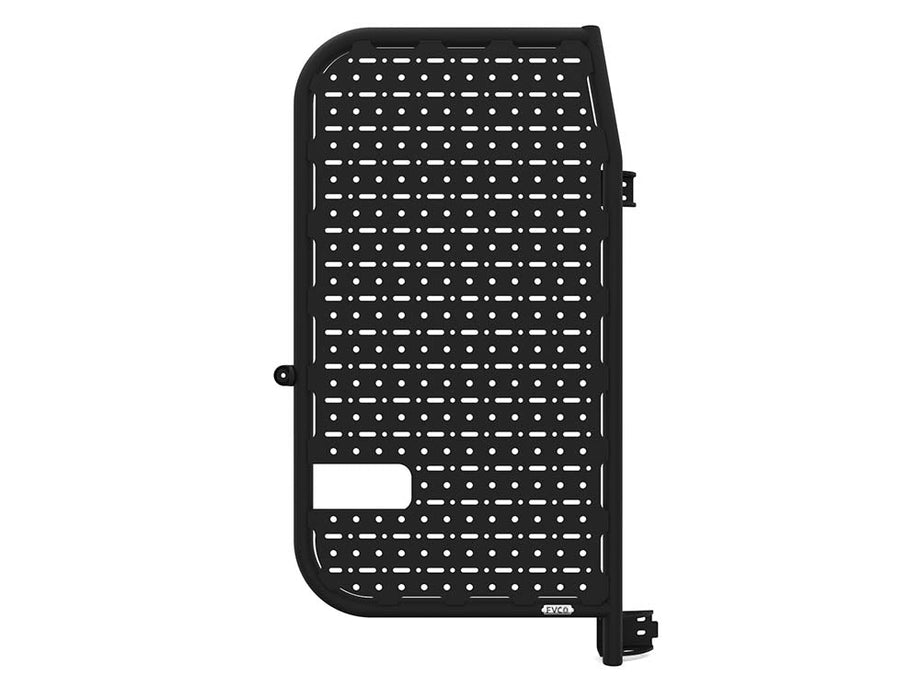
The Flatline Van Co. Sprinter Rear Door Platform adds a mounting surface at the back of the van for bikes, cargo boxes, MaxTrax, Rotopax, skis and snowboards. An aluminum round frame surrounds a mounting plate, with the usable surface sitting flush with the tubing to leave room for loading gear. Patterned slots and holes provide attachment points, and Flatline designed the platform so accessories can be swapped as your carrying needs change.
The platform attaches at the rear-door hinges and a third mounting point through the door. That third mount uses a dual-shock silicone damper, which Flatline says absorbs impact in both directions to protect the doors. Driver- and passenger-side platforms have different widths while sharing the same mountable height.
Round frame and plate
The frame uses 1.75” aluminum round tubing and a 3/16” aluminum mounting plate.
Accessory attachment pattern
Patterned 1/2" and 3/8" holes supplement the mounting slots.
Body-line alignment
The platform follows the body lines of the Sprinter van.
Manufacturer-listed fitment & checks
Vehicle fitment
As listed by Flatline Van Co.
- 2019+ Sprinter 1500/2500/3500/3500XD | 144"/170"/170" EXT | Low/High Roof
- 2020+ Winnebago Revel
Choose your door and hinge option
Each side is offered as a platform alone or with 180-degree hinges.
Sprinter Rear Door Platform (Passenger)
- Passenger-side platform
- For use with 180-degree rear-door hinges
Sprinter Rear Door Platform + 180 Hinges (Passenger)
- Passenger-side platform
- Includes 180-degree hinges
Sprinter Rear Door Platform (Driver)
- Driver-side platform
- For use with 180-degree rear-door hinges
Sprinter Rear Door Platform + 180 Hinges (Driver)
- Driver-side platform
- Includes 180-degree hinges
Rear windshield wipers
Does not work on vans with rear windshield wipers due to the motor location.
Drilling required
Both platforms require drilling the rear door for the third mount. The passenger-side guide calls for exterior and interior drilling, deburring and rust prevention; the driver-side guide requires additional drilling and the supplied panel plug for panel-style door trim.
California Proposition 65 warning
WARNING: This product can expose you to chemicals including Carbon Black & Titanium Dioxide which are known to the State of California to cause cancer. For more information, go to www.P65Warnings.ca.gov.
Door attachment
Requires 180-degree rear-door hinges. Vans with 270-degree hinges must have them replaced with 180-degree hinges; the guides note that the factory rubber bump stop may need to be transferred to the replacement hinges.
Installer requirement
Flatline recommends professional installation. If you have no mechanical experience and are not thoroughly familiar with the installation procedures, its guides require a professional installer or other qualified person.
Before use
Properly assemble and secure the platform before attaching it to the van. Check mounting points and attachments before use, and regularly inspect for wear or damage.
Specs, parts & installation
Frame and mounting
| Frame | 1.75” aluminum round frame |
|---|---|
| Mounting plate | 3/16” aluminum |
| Accessory holes | 1/2" and 3/8" |
| Suggested weight limit | Flatline Van Co. states a suggested weight limit of 200lbs. |
| Third mount | Dual-shock silicone damper |
Driver side
| Mountable surface | 50.75” tall by 28.25” wide |
|---|---|
| Overall dimensions | 52.5" tall by 30" wide |
Passenger side
| Mountable surface | 50.75" tall by 27.5" wide |
|---|---|
| Overall dimensions | 52.5" tall by 29.25" wide |
What’s in the box
Platform and mounts
Rear door platform, two hinge backing plates, door mounting boss, bushing cap, short bushing, tall bushing and sealing washer.
Templates and drilling parts
Passenger side: exterior and interior drill templates. Driver side: one drill template. Both guides list a multidiameter drill bit and snap-in panel plug.
Fasteners
Mounting screws, 3/8 flat washers and 3/8-16 nylon locknuts. The passenger-side hardware table lists nine flat washers and five locknuts; the driver-side table lists five of each.
Hinge options
180-degree hinges are included with the corresponding “+ 180 Hinges” selector options.
Installation at a glance
Flatline’s guides list 1-2 HOURS for the passenger side and 1 HOUR for the driver side, and suggest additional help for some steps.
Remove the lower interior door panel if applicable; for the driver side, also clear wires, insulation or other obstructions from the mounting area.
Drill the third mount using the matching side-specific templates and guide, then attach the platform to the hinge backing plates and assemble the third-mount bushings.
Passenger side: carefully open the door to approximately 135° (45° away from the side of the van) to adjust the lower hinge stop, align the platform with the body lines, then tighten the hinge and third-mount fasteners.
Driver side: tighten the bushing assembly until the tall bushing shows slight compression, align the platform with the door/window body lines, and check that the lower hinge bracket’s door stop engages the factory bump stop before tightening the hinge fasteners.
Replace the lower interior panel if applicable.
Passenger-side drilling sequence
- Align the exterior template and mark the hole; drill a 3/16” pilot through both metal layers and enlarge to 5/8” with the included multidiameter bit.
- Deburr, clean with alcohol and apply rust-preventive paint or another suitable coating.
- Align the interior template, drill a 3/16” pilot through both metal layers and enlarge to 7/8”; deburr, clean and apply rust prevention.
Driver-side drilling sequence
- Align the drill template with the body lines and mark the hole. Drill a 3/16” pilot through the first layer, then drill through all with a 3/8” bit.
- Use a step bit to enlarge the outside hole to 5/8” for the mounting boss.
- For panel-style door trim, drill through again with a 1/4” or similar bit long enough to reach the backside sheet metal, then enlarge the inside hole to 7/8” for the panel plug.
Source notes
- Flatline’s passenger-side guide lists 3/8-16 × 3.5 screws for the third mount and 3/8-16 × 1.25 hinge screws on page 4, but page 9 labels the third-mount screw 3/8-16 × 3 and step 3.1 on page 8 calls for 3/8-16 × 1.5 hinge screws; disputed screw lengths are omitted from this listing.
- Flatline’s product page says installation requires a single hole; its passenger-side guide gives separate exterior and interior drilling sequences, which this listing follows.
- Flatline’s product page says most installations take less than 90 minutes; its guides list 1-2 HOURS for the passenger side and 1 HOUR for the driver side, which this listing follows.
- The passenger-side guide labels both backing plates “LOWER HINGE BACKING PLATE” on page 3, while step 3.1 and the page 8 diagrams identify upper and lower hinge locations; this listing describes two hinge backing plates without repeating the duplicated label.
Lead Time
In-stock dispatch: 1–2 business days; LTL delivery: typically 7–21 business days; preferred service uses flat rates; economy may be free with longer lead times.
Read Flatline Van Co. lead time policy on WNDR BuiltWarranty
Flatline-made products have a one-year limited warranty for the original purchaser; purchaser-paid claim returns and exclusions apply; other manufacturers’ products carry only their applicable manufacturer warranties.
Read Flatline Van Co. warranty policy on WNDR BuiltReturns
Returns within 30 days of receipt require RMA, unused original-packaged items and 20% restocking; customer-paid shipping unless Flatline error; clearance/garage-sale/final-sale excluded; identified custom/made-to-order exclusions may apply.
Read Flatline Van Co. returns policy on WNDR BuiltWhat are people saying?
Find owner feedback, discussions, and installation videos for this product.
Searches use the manufacturer and product name and open in a new tab. Results may include similar products.
WNDR Built Community
Our community blog is coming in the future.
Community · Coming soon