
 White Top Adventures
Ford Transit Rear Door Atlas Storage Rack | Passenger Side
Indexed listing. WNDR Built doesn't sell this product; the button opens whitetopadventures.com.
A rear-door mounting wall for your gear
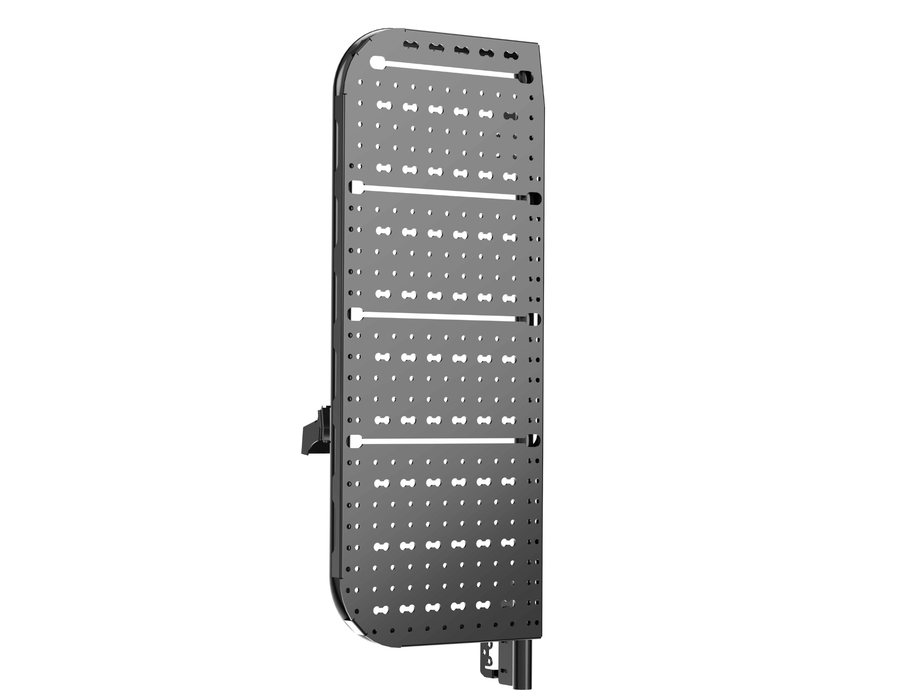
The Atlas rack puts tools, recovery gear, a first aid kit or camp kitchen equipment on the rear door, where they are accessible when the door swings open. Its MOLLE-compatible face uses a grid of bone-shaped slots and round perforations for modular accessory mounting. White Top Adventures says accessories can be rearranged without drilling new holes in the panel.
The panel sits inside a formed aluminum side frame, with welded horizontal rails adding structure and mounting rows. Rounded corners follow the door contour. Rather than enclosing gear in a single compartment, the rack provides a mounting surface that can be paired with the maker’s separately selected storage boxes, basket, bike rack adapter or rack poles.
MOLLE-compatible face
Full MOLLE-compatible panel face with bone-shaped slots and round perforations for modular, tool-free accessory mounting.
Welded rails
Five full-width horizontal rails welded across the panel.
Aluminum frame
Heavy-gauge aluminum with a matte black powder coat. Formed aluminum side channel frame.
Door-shaped profile
Rounded corner profile that follows the Transit door contour.
Manufacturer-listed fitment & checks
Vehicle fitment
As listed by White Top Adventures
- 2015+ Transit 150/250/350 | 130"/148"/148" EXT | Mid/High Roof
- 2023-2024 Transit Trail | 148"/148" EXT | Mid/High Roof
Drilling required
The installation guide requires drilling the passenger rear door using interior and exterior templates, then protecting exposed metal with rust-inhibiting paint.
Installer requirement
White Top Adventures strongly advises professional installation. If you lack mechanical experience or are unfamiliar with the procedures, its guide requires a qualified professional or someone with the necessary expertise.
Attachment checks
The guide calls for inspecting mounting points and attachments before use and regularly checking for wear or damage.
Door attachment
Passenger side rear door. Compatible with both hinge types. The installation guide mounts the rack through upper and lower hinge brackets, an internal door bracket and a lower frame brace.
Optional add-ons
Rear Door Atlas XL Storage Box, Atlas Storage Box, Universal Rear Door Basket, Atlas Bike Rack Adapter, Rear Door Rack Poles (4 Pack); selected separately.
Specs, parts & installation
Panel & construction
| Panel face | 23.5" width × 59.25" height |
|---|---|
| Material | Heavy-gauge aluminum |
| Finish | Matte black powder coat |
| Rails | 5 full-width horizontal rails |
Maker load ratings
| Static load | White Top Adventures states 300 lbs ("Unless otherwise specified by the manufacturer") |
|---|---|
| Dynamic load | White Top Adventures states 300 lbs ("Unless otherwise specified by the manufacturer") |
What’s in the box
Rack & mounting parts
One each: rear rack, upper hinge bracket, lower hinge bracket, lower frame brace and internal door bracket.
Drilling templates
One exterior drill template and one interior drill template.
Hardware
All hardware included. The guide lists one M8-40 flanged hex head screw, six M8-25 flanged hex head screws, one M8-30 button head screw and eight M8 nylon locknuts, plus flat washers.
Installation at a glance
Installation involves interior door-panel removal, hinge-bracket fitting and door drilling.
Use the linked Transit rear door rack guide for the full procedure.
Align the rack with the door/window body lines before final tightening. Open and close the door to check for interference and alignment; tighten the lower brace with its foot contacting the door.
Guide sequence
- Remove the lower interior passenger rear door panel; the guide recommends plastic panel-removal tools and shows where to peel back the vapor barrier.
- Mark the lower hinge position, remove its three factory bolts with a 13mm socket, fit the lower hinge bracket and reinstall the factory bolts using the alignment marks. Repeat on the upper hinge.
- Align the interior paper template using the door holes. Align the exterior template with the door edge and handle indentation, parallel to the lower window edge. Mark and punch the drilling positions; drill and protect exposed metal with rust-inhibiting paint.
- Place the internal door bracket inside the door, aligning its holes with the interior and exterior door holes. The guide uses a 13mm socket and 5mm Allen wrench to secure the bracket.
- Attach the rack through the upper and lower hinge brackets and the drilled door mount, leaving the bolts loose for alignment. Finish by tightening and checking door movement and the lower frame brace.
Source notes
- White Top Adventures’ Transit rack V1.1 guide hardware table lists M16 flat washers ×9; step 4.2 calls for two M8 flat washers, and step 5.3 also specifies M8 washers. The washer size and quantity are not presented as settled box contents.
- White Top Adventures’ product page describes two lower mount brackets; its Transit rack V1.1 guide lists an upper hinge bracket, lower hinge bracket, internal door bracket and lower frame brace. This listing follows the guide’s mounting arrangement.
Lead Time
Free shipping: most continental-US orders on Shipping policy, all lower-48 orders on FAQ, all orders on Homepage banner; remote-location and special-freight fees may apply.
Read White Top Adventures lead time policy on WNDR BuiltWarranty
Read White Top Adventures warranty policy on WNDR BuiltReturns
Returns within 30 days of delivery require unused, uninstalled, unassembled items in original packaging; 15% restocking and customer-paid shipping apply; large freight items have additional fees.
Read White Top Adventures returns policy on WNDR BuiltWhat are people saying?
Find owner feedback, discussions, and installation videos for this product.
Searches use the manufacturer and product name and open in a new tab. Results may include similar products.
WNDR Built Community
Our community blog is coming in the future.
Community · Coming soon