
 Van Compass
OUTBACK REAR DOOR SYSTEM - TRANSIT (2015-UP)
Indexed listing. WNDR Built doesn't sell this product; the button opens vancompass.com.
Rear-door storage without a surrounding carrier frame
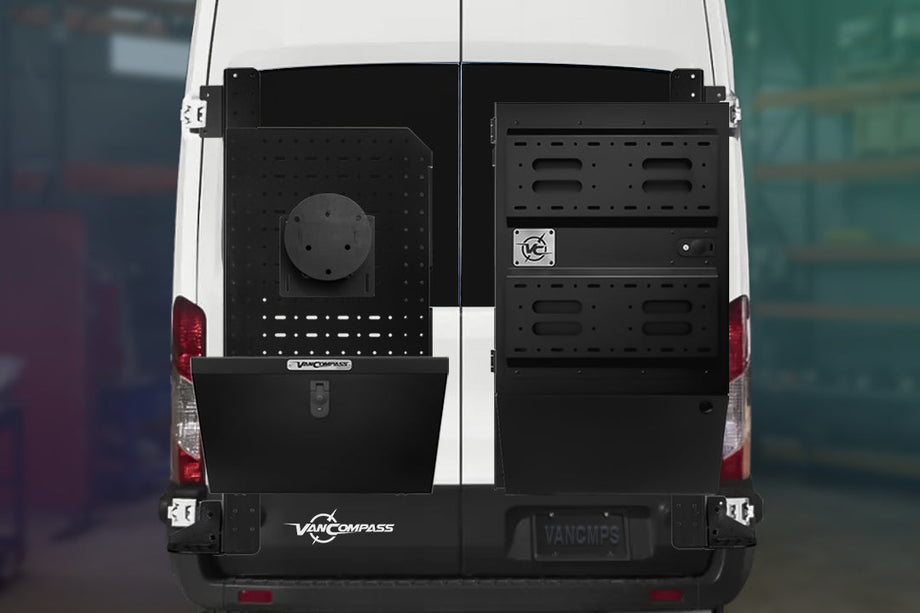
The OutBack system mounts exterior storage boxes or a utility panel to the factory rear door using separate carrier brackets rather than a surrounding frame. The brackets attach at four points on the door, creating the mounting base for the selected storage arrangement.
A Big Box configuration provides a box directly on the door mounts. The panel-based configurations instead use the Grid Utility Panel, either on its own, with a Little Box, or with a Little Box and spare-tire mount. You select the door side and configuration together.
Big Box shelving and door
The Big Box guide lists large, small and Packout shelves, describes multiple shelf positions and gives a procedure for reversing the box’s front-door swing.
Utility panel reinforcement
The utility panel uses two support gussets to stiffen its upper half.
Door-mount bushings
The door-mount guides use shock bushings at the center-plate attachments and specify slight compression rather than fully collapsing them.
Manufacturer-listed fitment & checks
Vehicle fitment
As listed by Van Compass
- Ford Transit · 2015-present · High Roof only.
- Drive type: ALL.
Choose the storage configuration
Every configuration is offered for DRIVER - LEFT or PASSENGER - RIGHT.
BIG BOX
- Door mounts for the selected side and a Big Box.
GRID PANEL ONLY
- Door mounts for the selected side and the Grid Utility Panel.
GRID PANEL AND LITTLE BOX
- Door mounts for the selected side, Grid Utility Panel and Little Box.
GRID PANEL AND LITTLE BOX WITH SPARE TIRE MOUNT
- Door mounts for the selected side, Grid Utility Panel, Little Box and vehicle-specific wheel mount.
Door drilling required
Installation requires drilling the rear door panels, deburring the holes and touching up exposed metal with paint.
Total door load
Van Compass states: MAXIMUM TOTAL DOOR LOAD NOT TO EXCEED 200LBS, INCLUDING BOX AND CONTENTS.
Fastener recheck
The guides require re-inspecting all fasteners after the first 50–100 miles of use and re-torquing/tightening as necessary.
Accessory requirements
The door mounts must be secured with an OutBack Big Box or Utility Panel; they are not standalone carriers and may damage the vehicle without one of those components. The Little Box mounts on the Utility Panel. The spare-tire mount requires the Door Mount and Utility Panel to be installed first.
Hinge spacers
The included spacers are required for hinges with a thin-profile plate and gussets; no spacers are required for flat-faced hinges.
Spare-wheel mount
The wheel-mount guide lists RWD and AWD Transit. Use the 160mm BC stud pattern for RWD and 180mm BC for AWD.
Specs, parts & installation
Carrier construction
| Brackets | Precision-cut and formed 1/4" aluminum |
|---|---|
| Finish | Powder-coated |
| Door attachment | 4 mounting points on the factory door |
What’s in the box
Door mounts — all configurations
Side-specific door-mount hardware includes hinge and center plates, hinge attachment parts, panel plates, striker or internal door supports, shock bushings and fasteners, as listed in the matching guide. The Transit kits also list hinge spacers, a drill template and paint-protection film; the passenger-side kit includes a handle extension and pinch plate.
Big Box configuration
Big Box with large shelf, small shelf, Packout shelf and mounting hardware listed in its guide.
Grid Panel configurations
Grid Utility Panel with two support gussets and mounting hardware. Little Box and its mounting hardware are included when that configuration is selected.
Spare-tire configuration
The wheel mount, three wheel studs, three lug nuts and mounting hardware listed in its guide are included with the Grid Panel and Little Box with Spare Tire Mount configuration.
Installation at a glance
The product page recommends 1 hour (per door) for door mounts, 0.25 Hours for the Grid Utility Panel, 0.5 Hours for the Little Box, 0.5 Hours for the Big Box and 0.25 Hours for the spare-tire mount.
The door-mount guides estimate 1–1.5 hours for a professional shop and 1.5–2 hours for driveway installation. The Big Box guide calls for at least two people; two people are also recommended, but not required, for the Utility Panel and Little Box.
Install the selected Big Box or Utility Panel before final tightening of the door mounts. Fit one Utility Panel support gusset at the uppermost position and the second in the upper half. For a Little Box, move any interfering Utility Panel screws so the box sits flat against the panel.
After installation, open and close both rear doors through their full range to check for interference.
The Transit guides require drilling both outer and inner door panels using the supplied templates. Remove only the outer hinge bolts to maintain door alignment, reuse the OEM hinge bolts and fit the passenger-side handle extension on that side.
Accessory installation estimates from the manuals
- Big Box: professional shop 0.5 hours; driveway 0.5-1 hours.
- Utility Panel: professional shop 0.25 hours; driveway 0.25-0.5 hours.
- Little Box: professional shop 0.25 hours; driveway 0.25-0.5 hours.
- Wheel mount: professional shop 0.25 hours; driveway 0.2-0.5 hours.
Tools listed in the guides
- Door mounts: SAE hex keys, basic wrench/socket set, auto trim tool, drill with metal-cutting bits and a felt pen. The driver-side guide lists a 7/16” drill bit; the passenger-side guide lists 7/16” and 17/64” bits. Scissors are listed for the paint-protection film/template.
- Box, Utility Panel and wheel-mount guides list a 7/32 Hex Key wrench and 9/16 wrench/sockets; the wheel-mount guide also lists a 22mm wrench/socket.
Wheel-mount depth adjustment
- The wheel plate depth must put the tire tight against the Utility Panel. The guide suggests setting the mount approximately 1/4” below a straight edge across the tire before securing it.
Lead Time
Orders ship first-come, first-shipped; international service is described separately on two pages; report loss, missing items or damage within 2 days of tracked delivery.
Read Van Compass lead time policy on WNDR BuiltWarranty
Specified hard parts: original-owner ownership term; Falcon shocks: 1 year; powder coating/excessive zinc corrosion: 60 days; professional installation required.
Read Van Compass warranty policy on WNDR BuiltReturns
Return-window start date varies by page; eligible unused returns incur 20% restocking and customer-paid shipping; electronics, including PedalBox, and CLOSEOUT items are final sale.
Read Van Compass returns policy on WNDR BuiltWhat are people saying?
Find owner feedback, discussions, and installation videos for this product.
Searches use the manufacturer and product name and open in a new tab. Results may include similar products.
WNDR Built Community
Our community blog is coming in the future.
Community · Coming soon