
 Flatline Van Co.
ProMaster Van Rear Door Platform
Indexed listing. WNDR Built doesn't sell this product; the button opens flatlinevanco.com.
A rear-door mounting surface for outdoor gear
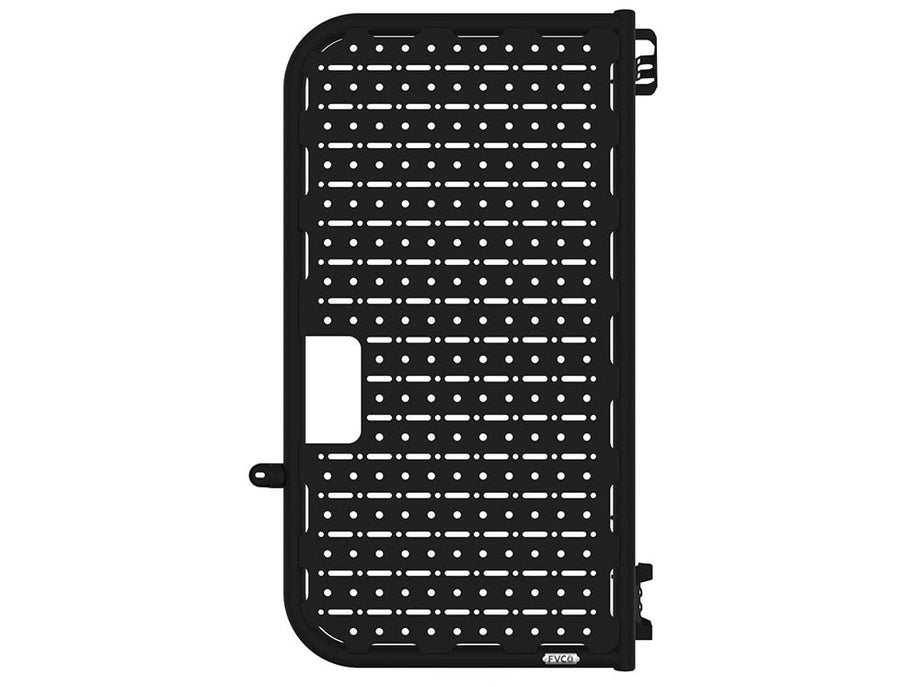
The ProMaster Rear Door Platform carries storage boxes, bikes, skis, snowboards and other gear outside the van. Its mounting plate sits flush with the surrounding round-tube frame, combining patterned holes and slots so different gear and accessories can attach to the same surface. Flatline describes the platform as sitting close to the van while retaining access behind it.
A third mounting point uses a dual-action silicone dampener that Flatline says absorbs impact in both directions. The included door strap lets you set the opening limit to keep mounted gear from swinging into the side of the van.
Hidden bottle opener
A bottle opener is built into the platform design.
Door-side versions
Separate passenger- and driver-side versions have different overall mounting-surface widths.
Manufacturer-listed fitment & checks
Vehicle fitment
As listed by Flatline Van Co.
- 2014+ ProMaster 1500/2500/3500 · 136 in / 159 in / 159 in EXT · High Roof
Choose your rear door
Select the version for the door that will carry the platform.
Promaster Rear Door Platform (Passenger)
- Passenger-side rear door
Promaster Rear Door Platform (Driver)
- Driver-side rear door
- Includes license plate relocation kit with LED light
Drilling required
Both guides require a third-mount hole in the rear door, drilled with a 3/16 in pilot and enlarged to 27/64 in, then deburred and painted. The driver-side guide additionally requires a wiring clearance hole of about 1/4 in for the relocated license plate light.
Door support and opening limit
Support the door while removing hinge bolts; the guides say not to use power tools on those bolts. Install the supplied limit strap to control the door’s opening and keep the mounted load from hitting the van.
Driver-side LED wiring
The driver-side light must be wired in parallel to the factory license plate light harness. Its guide notes that some vans may show a bulb-out warning; an appropriate load resistor, not included, typically resolves it.
Door attachment
The guides show upper and lower rear-door hinge brackets, a drilled third mount and a lower frame brace.
Installer requirement
Flatline recommends professional installation; anyone with no mechanical experience who is not thoroughly familiar with the procedure must use a professional installer or other qualified person, as stated in the linked guide.
Before use
As required by the linked guide, check mounting points and attachments before use and regularly inspect the product for wear or damage.
Specs, parts & installation
Frame and mounting plate
| Frame | 1.75 in aluminum round tubing |
|---|---|
| Mounting plate | 3/16 in aluminum |
| Brackets | Stainless steel |
| Gear mounting holes | Patterned 1/2 in and 3/8 in holes, plus slots |
Mounting surfaces
| Driver-side hole-pattern area | 45 in tall × 21 in wide |
|---|---|
| Driver-side mounting surface | 50.875 in tall × 27.75 in wide |
| Passenger-side hole-pattern area | 45 in tall × 21 in wide |
| Passenger-side mounting surface | 50.875 in tall × 27.375 in wide |
What’s in the box
Platform and door mounts
Rear door platform, frame brace, upper and lower hinge brackets, bushing cap, tall and short bushings, and drill template, as listed in the matching side’s guide.
Door control and hardware
Limit strap assembly, bottle opener, mounting fasteners and thread locker.
Driver-side version
License plate relocation bracket and LED light.
Installation at a glance
The product page says under 90 minutes; both side-specific guides allow 1–2 hours and suggest additional help for some steps.
Remove the relevant interior door trim, drill and finish the third mount, fit the hinge brackets and platform, check door clearances, and fit the limit strap.
The driver-side installation also relocates and wires the license plate light; follow its separate guide.
Tools listed in the side-specific guides
- Panel removal tool, painter’s tape, marker and measuring tape
- Power drill, 3/16 in and 27/64 in bits, deburring tool and rust-preventative paint
- 9/16 in wrench/socket, T40 Torx, flathead screwdriver, 5/32 in and 7/32 in Allen wrenches, 4 mm Allen wrench and 5 mm wrench/socket
- Driver-side wiring step additionally specifies a roughly 1/4 in drill bit
Lead Time
Flatline’s FAQ lists in-stock dispatch in 1–2 business days and free lower-48 shipping; its Shipping policy lists flat-rate shipping or potentially free, slower economy shipping, with typical LTL delivery in 7–21 business days.
Read Flatline Van Co. lead time policy on WNDR BuiltWarranty
The Refund policy gives the original purchaser a one-year limited warranty covering product cost only, excluding installation, labor, freight, wear, misuse and racing, competition or trail-use damage, and void for alteration, modification or improper installation.
Read Flatline Van Co. warranty policy on WNDR BuiltReturns
Unused items in resalable condition and original packaging may be returned within 30 days of receipt with a pre-authorized RMA and a 20% restocking fee; customers pay return shipping unless Flatline erred, LTL returns need coordination, clearance/garage-sale/final-sale items are excluded, and custom or made-to-order items may be non-returnable.
Read Flatline Van Co. returns policy on WNDR BuiltWhat are people saying?
Find owner feedback, discussions, and installation videos for this product.
Searches use the manufacturer and product name and open in a new tab. Results may include similar products.
WNDR Built Community
Our community blog is coming in the future.
Community · Coming soon